The nip2 approach: each processing result is a cell
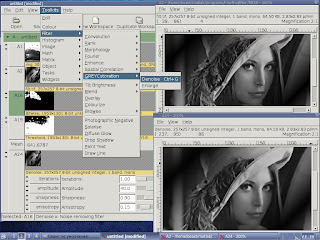
Nip2 has a non-trivial yet productive interface that is a kind of mix between a spreadsheet and a graphical editor (imagine a cocktail with Photoshop and Excel). The result of any operation is put down into a cell and you can make references to any cell (that is an image after some processing operation). For example, you can select the area of interest (cell A2) on the original image (cell A1) and apply some filter to region of interest that will be A3 cell. Such an interface allows you to quickly recalculate the resulting image if any parameters of previous filters have been changed.
The screenshot illustrates such paradigm.
Hence the nip2 is not a conventional graphical editor but rather a graphical analyser. Nip2 supports the most useful graphical formats such as TIFF, JPEG, PNG, PPM, as well as scientific formats like MAT (MATLAB's matrices) and convolution matrices. Thanks for using VIPS library, the nip2 allows to view extremely large images very fast: you definitely appreciate such feature is you process scientific data.
What is expected to find in NIP2 and what is not
To reiterate, the nip2 is rather a scientific images analysis laboratory than just another raster images editor. So there are no tools for layers and masking (and such tools are not needed). But when one deals with large images such as panorama, nip2 is priceless. Moreover, there are many advanced images processing algorithms that are hardly to be found in conventional editors: morphological images analysis, Fourier transform, statistical tools, and many other.
Few words about the interface of nip2
As above, the spreadsheet-like paradigm of nip2's interface allows you to change filter's parameters and quickly recalculate the resulting image. I'm going to show this on an example.
For instance, there is a sequence of filters that you need to apply on image - changing one parameter results on the destination image. Then you need to apply the filtering sequence for another image - and here the nip2 to rescue you: just right-click on any cell in nip2 and select "Replace from file".
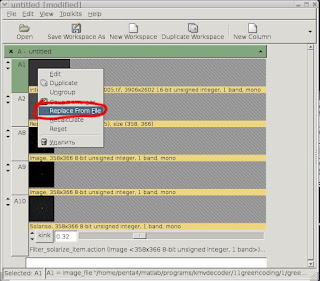 That is enough for recalculation of the whole filtering sequence.
 Intensity-scale change for images viewing
This is a very helpful feature when you need to view an image with specific grey levels (e.g., 12-bit raw images from the digital camera).
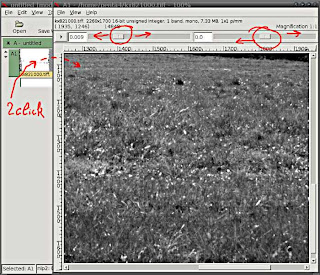 In order to change the intensity scale of the image, just left-drag to set number of brightness or contrast magnification. It does not affect on the real image's values but just for viewing.
Quick zooming
If you need to zoom-in or out quickly, just hold CTRL button on the keyboard and turn mouse's wheel.
Hotkeys in в nip2
The assignment of the hotkey for any menu function is really easy: just open nip2's menu, select the item and (when the item is selected) press a hotkey combination. The hotkey combination for that function will be assigned instantly.
Fast region selection
If you need to select the region of interest on the image, just hold CTRL keyboard button and start selecting the area on the image. A new cell that contains the selected appears instantly in the current column and the next number (e.g., if the current column is B and the last number of cell is 14, cell B15 with the region appears).
Quick scrolling of the image
Images analysis in nip2
Using nip2, one can perform advanced images processing and analysis by such tools as Fourier transform, correlation analysis, filtering and morphological analysis. The most common examples that I use daily have been provided below.
Fourier analysis in nip2
In many cases it is necessary to look not only on the image but on its Fourier spectrum. In contrast with conventional images editors, there are no problems in nip2: just use Toolkits - Math - Fourier - Forward and enjoy. You should nonetheless take into account that for large images Fourier transform can take a long time (~10-15 seconds depends on CPU's horsepower).
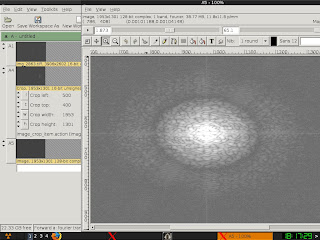 The reverse Fourier can be performed likewise using Toolkits - Math - Fourier - Reverse .
Images' histograms in nip2
A histogram can deliver the information about how much pixels of the same level contains the image being analysed. Indeed, this is a very useful feature, and you can find it in Toolkits - Histogram - Find - One Dimension.
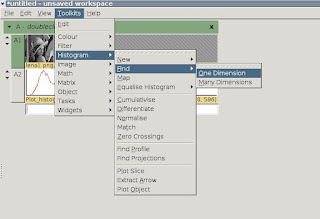 As a result, we have a beautiful and informative histogram for the image.
Images edition in nip2
Of course you can edit and transform images in nip2 but some of the functions can look like kind a philosophical.
Cropping
There are two ways to crop the image: use Toolkits - Image - Crop or just open the cell with the image and select the region of interest.
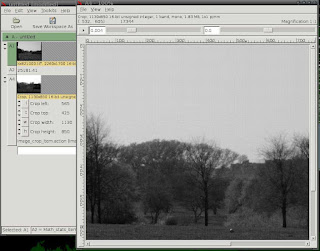 Or, using menu one can select the region of interest likewise: File - New - New Region.
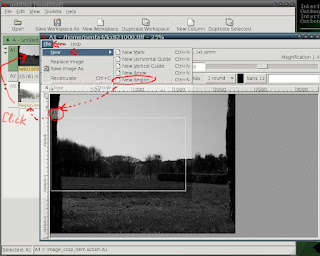
After that, you can save the cropped image by right-click and select "Save image as".
Threshold
The threshold function is concealed in the menu in Toolkits - Image - Select - Threshold.
Joining images in nip2
One of the most exciting feature of nip2 is joining images. While Photoshopers and Gimpers are buying heaps of RAM for their computers, nip2 users can join large images easily. Just use Toolkits - Image - Join - Left to Right or Toolkits - Image - Join - Top to Bottom and what we have:
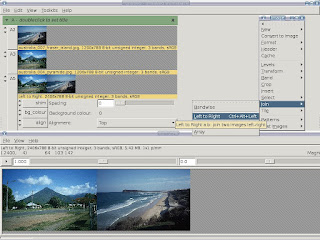 This is much more easy and way faster than in Photoshop or Gimp: I have glued together 10x10 images each of which is 3000x2000 pixels on a notebook computer with only 512Mb RAM.
 Tilt brightness
It happens sometime, and brightness tilt is very boring effect (i.e., when you analysing images from microscope, it is difficult to capture it without such brightness artefacts). But using nip2, one can correct tilt brightness using Tools - Filters - Tilt brightness.
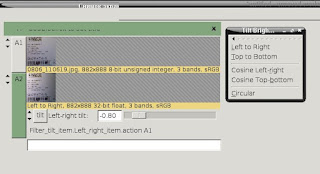 Such function restores correct illumination on the image (to some extent, of course).
Conclusion
This post is actually a collection of my favorite tips and tricks of work in nip2. I'm going to update this post from time to time. And, of course, I would like to thank John Cupitt, Kirk Martinez, and Joe Padfield for such a great program!
